
WORK IN PROGRESS Last Edited: 18/7/2020
The objective of this note is to document my steps in getting a Turtlebot2 with a Kobuki base localizing on a static map so that I can reference at a future date. The static map was created using the slam_toolbox package, and laser scans from a RPLidar A2 mounted on top of a Turtlebot2. I use the AMCL package for localization, as I haven’t been successful in getting the localization mode to work with the slam_toolbox package at the time of this writing. (11th/7/2020) I’ve placed all necessary launch files and robot descriptions at the following repo.
Robot details
Constructing the Turtlebot 2 to run freely is not cheap as you can see from the list of hardware.
| Cost | ||
|---|---|---|
| Robot | Turtlebot2 w/ Kobuki base | $1049.00 |
| Lidar | RPLidar A2M8 | $449.00 |
| Computer | NUC8i7BEH | $729.99 |
| Power | Portable Charger RAVPower 27000mAh 85W(100W Max) | $129.00 |
| Controller | PS3 Controller | $30.99 |
| Total: | $2387.98 |
Setup
- Install the necessary packages into your ROS workspace as turtlebot packages to support Turtlebot2 have not been released to Melodic and is a work in progress (22/6/2020). [1]
sudo apt install ros-melodic-laptop-battery-monitor
sudo apt install ros-melodic-openni2-camera
sudo apt install ros-melodic-openni2-launch
sudo apt install ros-melodic-gmapping
sudo apt install ros-melodic-yocs-msgs
sudo apt install ros-melodic-yujin-ocs

mkdir -p ros_ws/src
cd ros_ws/src
git clone https://github.com/turtlebot/turtlebot.git

cd turtlebot
git clone https://github.com/turtlebot/turtlebot_interactions.git
git clone https://github.com/turtlebot/turtlebot_apps
git clone https://github.com/turtlebot/turtlebot_msgs

cd ~/row_ws/src
git clone --single-branch --branch melodic https://github.com/yujinrobot/kobuki.git

### To work with this guide clone the turtlebot2_lidar repo.
git clone https://github.com/surfertas/turtlebot2_lidar.git
- If you take a look at the
turtlebot2_lidarrepo, you can see that I have created a URDF representation of the lidar device and placed the file in theurdf/sensorsdirectory, e.g. in this case the file name isrplidar_a2.urdf.xacro. The specifications of the RPLidar A2 were taken from the [device data sheet]. Add the device to the robot description. You can use Onshape to design a mount or feel free to use mine for the RPLidar A2. The Turtlebot data sheet comes in handy as well. [2]
Steps to create a map
- Place your turtlebot on the power dock. It is recommended that the dock is fixed to a specific location free from obstruction. Boot up the NUC powered by the portable charger.
- You will need to ssh from 4 panels, for 1) bringup 2) slam_toolbox 3) rviz 4) teleop. For panel 3) add the argument
-Xwhen using ssh to allow for forwarding. [3] Forwarding will be needed when using RVIZ from your remote pc. - Source the necessary environment from your working directory. Run
source /opt/ros/melodic/setup.bash && source devel/setup.bash. - Next on panel 1), check which port the lidar is connected to by executing the following command
ls -l /dev | grep ttyUSB. In my case, the lidar was required to be connected tottyUSB0asttyUSB1was being used by the connection to the Turtlebot. This paramater is set as a environment variable when your run the environment script. Once the NUC is powered on, unplug any USB cables, and make sure that the lidar is connected first, sottyUSB0is assigned to the lidar. - Change permissions of the port by executing
sudo chmod 666 /dev/ttyUSB0 - Run
roslaunch turtlebot2_lidar bringup_minimal.launchin panel 1). At this point you should see the lidar start to spin. - On panel 2) run
roslaunch turtlbot2_lidar slam_toolbox_lidar.launch. I had to add astatic_transform_publisherto the launch file publish a transform from thebase_laser_linktolaser. Note that thebase_laser_linkwas defined inurdf/sensors/rplidar_a2.urdf.xacro. - On panel 3) start up RVIZ by running
roslaunch turtlebot_rviz_launchers view_navigation.launchwhich will kick off RVIZ on your remote laptop. You should see a top down visual of the Turtlebot with scans picking up some nearby obstacles. Get the slam_toolbox panel open in rviz by selecting from the top left menu: Panels->Add New Panel-> slam_toolbox->SlamToolboxPlugin. - Finally on panel 4) run
roslaunch turtlebot_teleop ps3_teleop.launch. Make sure that the ps3 controller has been synced with the NUC. Steps to sync can be found here if you are having trouble. [4] - You are ready to create a map! Teleop around and continue until you are satisfied with the generated map.
- To save the map we need to start by inputting
<path_to_directory>/<name>tosave mapand also forserialization(to be used with slam_toolbox localization mode). Note that the name doesn’t have the file type, just the prefix. (e.g. if you want files likemap.pgmandmap.yaml, use<path_to_directory>/map). If no path is specified, the files will be placed in~/.ros. - Now you should have the necessary files needed for localization.
Steps to localize using the new created map and the AMCL package
- Open a terminal panel and ssh into the NUC. Go to the root of the workspace directory and source the ROS environment.
source /opt/ros/melodic/setup.bash && source devel/setup.bash - Set the environment variable
TURTLEBOT_MAP_FILEinturtlebot_env.shwith the path to the.yamlfile that was created in the previous map creation process. Execute the bash file to update necessary environment variables.. turtlebot_env.sh - Launch
bringup_minimal.launchto boot up the physical turtlebot. Make sure that theTURTLEBOT_SERIAL_PORTis set to/dev/ttyUSB1or whatever port the turtlebot is connected to. - Launch RVIZ. Follow the aforementioned steps from launching RVIZ when creating a map.
- Before launching the AMCL launch file, set the argument defaults for
initial_pose_x,initial_pose_y,initial_pose_awith the position data obtained from the starting position in the mapping exercise (used the dock in my case). - Launch
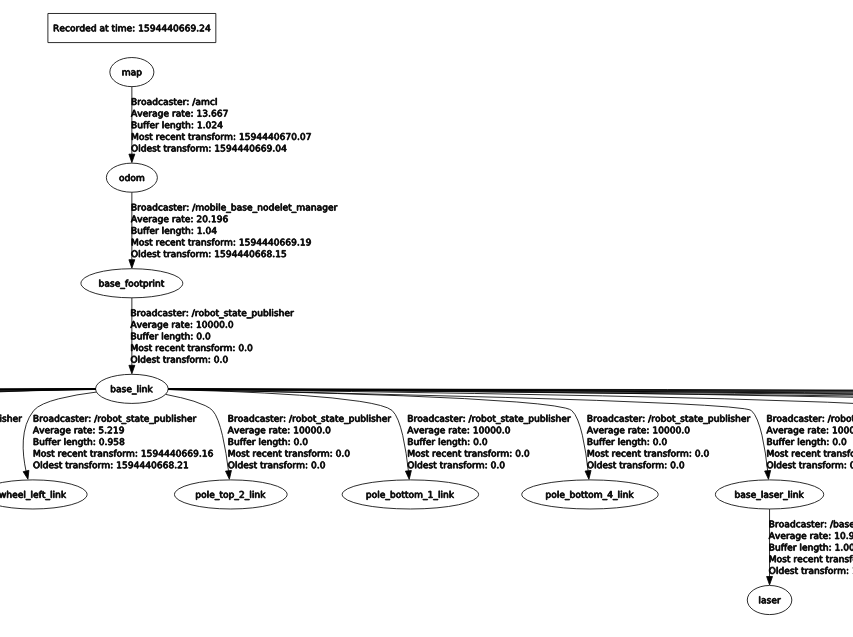
rplidar_a2_amcl.launch. A couple things to point out here. First, I am using the defaultamcl.launch.xmlfile. This hasn’t been tuned for the RPLidar A2 specifically. Secondly, I’ve added thestatic_transform_publisherto define the transform betweenbase_laser_linkandlaserhere as well, in addition to defining a parameter namedframe_idwith value set tomapwhich is passed to themap_server. Without these 2 steps I was getting transform errors. Userosrun rqt_tf_tree rqt_tf_treeto see if correct transforms are being published. In this case you the expected transforms aremap->odom->base_footprint-> base_link
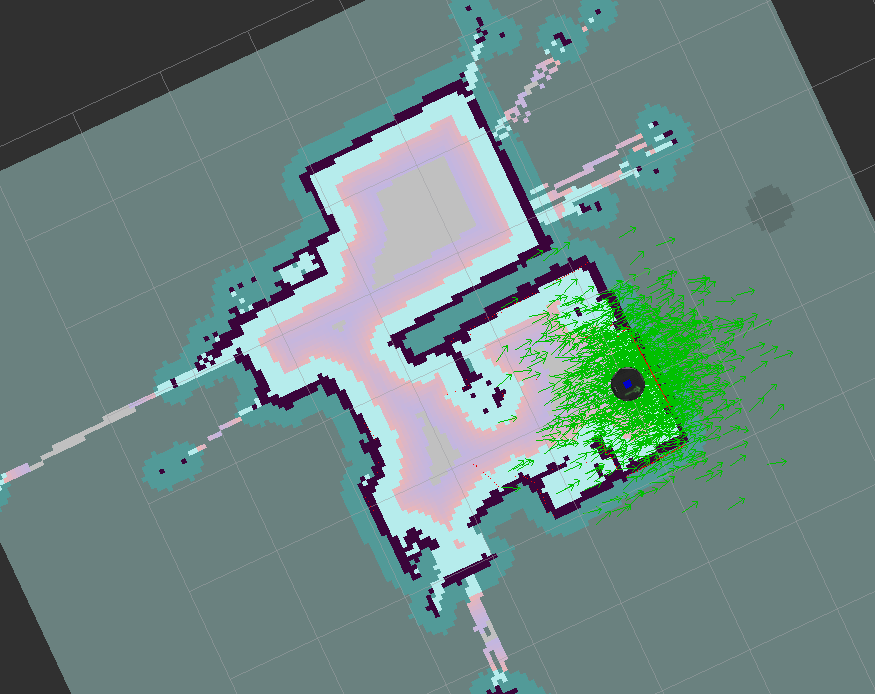
- If the laser scan isn’t really lining up with the map as you would expect, use
2D Pose Estimateto publish a pose estimation. Repeat until the scan matches as expected. - Once the scans match up, you are ready to navigate. In RVIZ, use 2D Nav Goal to set a target goal and watch your turtlebot go.
Localization with slam_toolbox (INCOMPLETE)
- Repeat steps 1.-4. of localization with AMCL package.
- We need to modify the params yaml file that is passed to the
slam_toolboxpackage. The original config dir is located atslam_toolbox/config. I moved the config directory underturltebot2_lidarfor easy modification. The file that needs to be modified ismapper_params_online_sync.yaml. - Change the
modeparameter to localization from mapping. Further you can set themap_file_name,map_start_pose,map_start_at_dock. Note formap_file_namedon’t include the file type. (e.g. /map.posegraph would just be /map)
TODO: debug Failed to compute laser pose, aborting continue mapping (“laser” passed to lookupTransform argument source_frame does not exist. ) Tried publishing the transform via different launch file but still doesnt work but Removing the / from /laser in the static_transform_publish made it so laser was recognized, but now getting different issue Failed to compute laser pose, aborting continue mapping (Lookup would require extrapolation at time 1593875399.670327337, but only time 1593875399.833934289 is in the buffer, when looking up transform from frame [laser] to frame [base_footprint])
References
- https://github.com/turtlebot/turtlebot/issues/272
- https://clearpathrobotics.com/turtlebot-2-open-source-robot/
- https://superuser.com/questions/310197/how-do-i-fix-a-cannot-open-display-error-when-opening-an-x-program-after-sshi
- http://surfertas.github.io/amr/deeplearning/machinelearning/2018/12/22/amr-3.html